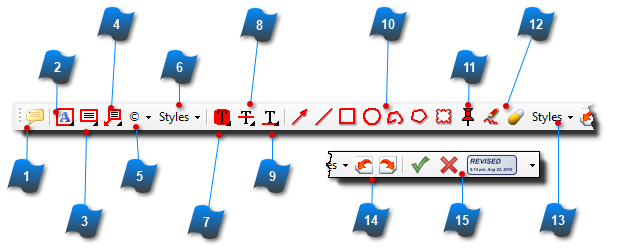
Markup and Comments Toolbar
This toolbar contains all the fun stuff. Make notes and comments. Edit text. Draw shapes, arrows and callouts. Attach files and input stamps.
Most tools can be formatted by color, font, lines, and other properties depending on the tool being used.
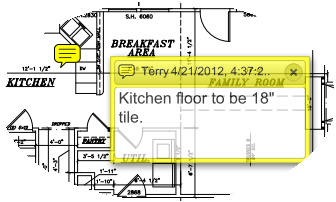
 Sticky Note
A tool to input a quick note for a general or specific location.
Click in the document where the "Sticky Note" will be located and immediately following a window will pop up to enter the message in the sticky note.
|
|
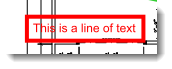
 Typewriter Tool
This tool is used to insert text on a single line.
The "Typewriter Tool" is similar to inserting a piece of paper in a manual typewriter and typing on it. Click on the document where text is to be entered and begin typing. Right -click for formatting options within each area of typed text.
|
|
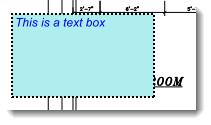
 Text Box Tool
The Text Box tool is used to insert text in a formatted multi-line box.
Click and drag a box to the desired size and enter text in it. Right -click for formatting options within each area of typed text.
TIP: This tool can be used to wipeout or overwrite existing text by setting the background color to white and the border color to none. Please note that this method does not remove the text under the comment / markup.
|
|
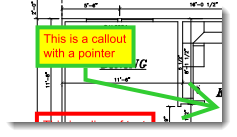
 Text Callout Tool
Text in a formatted mulit-line box with a pointer. Similar to the Text Box tool with the ability to add a pointer.
Click to locate the endpoint of the callout arrow and then drag away from that point to locate the callout text location.
|
|
 Symbols Tool
Click the icon to display a dropdown selection to input a special symbol.
|
|
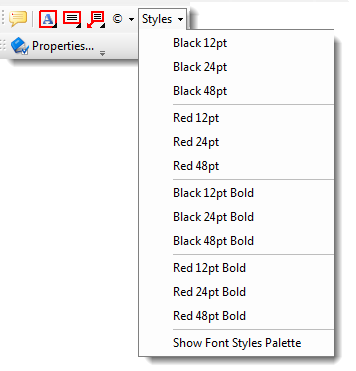
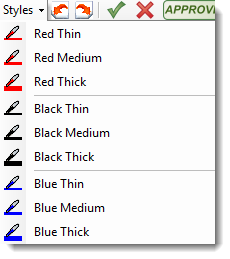
 Text Callout Styles
The formatting of Text Callouts can be quickly set using pre-set styles from the dropdown box.
-
Choose from pre-set styles. -
Affects all Text Callout tools. -
After input, objects can be individually styled using the formatting toolbar or using the Select tool, right-clicking the object and selecting Properties
|
|
 Highlight Text Tool
Similar to using a highlighter pen, you can highlight text within a document. Please note that if the document was created via a scanned image or with "text as graphics", then highlighting with this tool is not possible.
TIP: To highlight scanned text, use the "Rectangle Tool" and set the background transparency to the desired percentage to create a similar effect.
|
|
 Cross Out Text Tool
Use the "Cross Out Text Tool" to draw a line through the middle of text (Strike-out). Please note that if the document was created via a scanned image or with "text as graphics", then crossing out text with this tool is not possible.
TIP: To strike-out scanned text, use the "Line Tool" and draw a line through the text to create a similar effect.
|
|
 Underline Text Tool
Use the "Underline Text Tool" to underline text. Please note that if the document was created via a scanned image or with "text as graphics", then underlining text with this tool is not possible.
TIP: To underline scanned text, use the "Line Tool" and draw a line under the text to create a similar effect.
|
|
 Objects and Shapes Tools
|
|
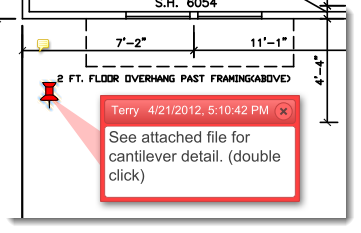
 Attachments Tool
Attach files directly to the drawing. When the end user double-clicks on the pin, the file will open in the appropriate program.
|
|
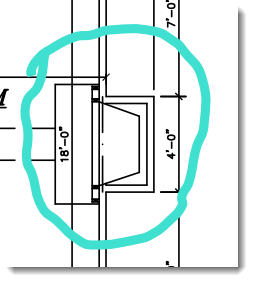
 Pencil and Eraser Tool
The Pencil Tool is used to draw freehand objects. Use the eraser to edit the pencil input.
|
|
 Objects and Shapes Styles
The formatting of Shape Callouts can be quickly set using pre-set styles from the dropdown box.
-
Choose from pre-set styles. -
Affects all Object and Shape tools. -
After input, objects can be individually styled using the formatting toolbar or using the Select tool, right-clicking the object and selecting Properties
|
|
 Rotate Current View
For adding annotations at a different angle.
-
Stamps, annotations and callouts are always input horizontally as you are viewing the page.
-
To input vertically or upside-down, use this rotate tool then input your object.
-
Note: The drawings will not save the rotated view using this tool.
|
|
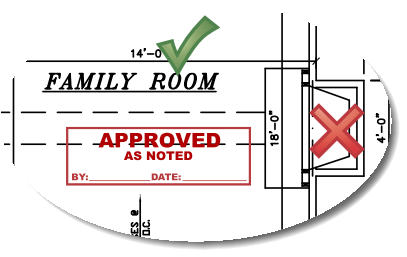
 Stamp Tool
The "Stamp Tool" is similar to the rubber stamp and ink pad method of applying a standardized annotation to a document.
Use the "Stamps Palette" pulldown the tool bar to select different stamps.
AcroPlot Matrix supports both static and dynamic stamps.
-
Two custom stamps are visible for quickly inputting most often used stamps
-
A library of stamps are available from the dropdown box
-
Different stamp collections can be displayed -
Click on Show Stamps Palette at the bottom of the dropdown screen to customize this display
|
|